 After the winter begins, and where and in the period of late autumn, snowfalls begin. For most people, snow is certainly a joy: snowball fights, building snow forts, skiing and sledding, and much more. Basically, this of course concerns children, although adults are also mostly happy with the onset of winter. However, winter can bring exceptional joy only to residents of high-rise buildings, and if you live in a private house or cottage, then snowfalls will bring you a lot of hard physical work in addition, namely cleaning the territory of the site from snow, at least cleaning the paths and the driveway for car.
If you have a special mobile unit called a snowplow, then the problem of clearing snow is of course much easier to solve, and if you can’t afford to buy a snowplow, there remains a proven and reliable way - to work with a snow shovel.
A shovel can be purchased at a store, or you can make it yourself, since it is quite simple and requires very few materials and tools. It is the topic of how to independently make a snow shovel with your own hands that we decided to discuss in this article.
To begin with, let's define what a snow shovel is and what basic characteristics it should have.
First, it must be strong and of the correct length. If there is a lot of snow, and even it is wet, then the load on the shovel will be quite large and it will be very disappointing if the shovel breaks after the first ten meters of the cleared path. The length of the shovel is important for the convenience of work. Too long or vice versa too short a tool is very inconvenient to work with, besides, due to the wrong position during work, you will simply get tired quickly.
Also, the shovel should be of the optimal area, because it is inconvenient to work with a very wide shovel, besides, even a physically strong person will not be able to work with it for a long time - there will be too much stress on the arms and back.
If we consider various options for creating a snow shovel, then it is most advisable to choose one of the following designs.
The first option is to make a snow shovel out of plywood, and the second out of tin. These materials are easy enough to find, they can just be lying around in your garage, if necessary, you can buy them at a store for a small price, and finally, to create a snow shovel based on them, you will need a minimum of tools. Well, now let's take a closer look at the technology for creating both types of snow shovels.
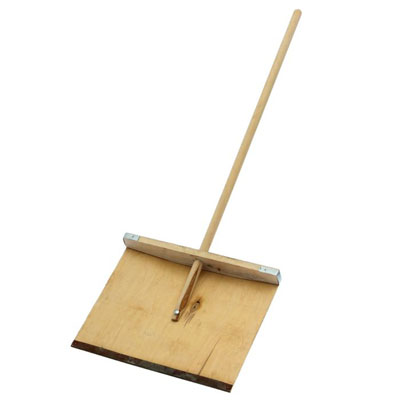 Plywood snow shovel
If we consider this version of a snow shovel as a whole, then we should immediately say that it is the cheapest. Judge for yourself - a piece of plywood, a small piece of tin and a handle, well, a few more nails and self-tapping screws. As a rule, there is all this in a private house - lying around somewhere without any use. But let's move on to the description of the work on the creation of this tool.
For the shovel itself, ordinary plywood 4 mm thick is suitable. Of course, you can take it thicker, but then the shovel itself will turn out to be quite heavy and you will spend a lot of energy not on cleaning the snow and waving the shovel itself.
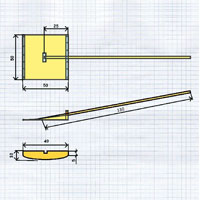
Ideally, it is best to take a square of 50 x 50 cm as the main part of the shovel. A larger size will certainly increase work productivity, but again you will get tired quickly, and if you are not very physically developed, then perhaps a larger shovel will not suit you at all. As an alternative, of course, you can make a snow shovel and a rectangular one: for example, 60 cm long and 40 cm wide, but not vice versa. If the shovel is very wide, then if you collect snow unevenly on it (as you usually get to scoop it up), then the shovel will fill up sideways and it will simply rotate in your hands around the axis and the snow will fall almost in the same place where you shoveled it onto the shovel.
Plywood for a shovel should not be stratified, otherwise it will not last long, because you will still throw water, albeit frozen to the state of snow.
You will also need a piece of tin in the form of a rectangle with a length of the width of a shovel and a width of 5-8 centimeters. With it, we will strengthen the front of the plywood so that it does not quickly collapse. You can cut it out of sheet steel or from a piece of galvanized or profiled sheet using metal scissors. If the tin is thin, it can be cut even with old tailor's scissors, and if it is thick, you can take a grinder with a metal disk.
A classic shovel handle is suitable - you can buy it at any building tool store, or in the "everything for the house" stores, which are enough in the countryside.
We will cut it in the part that will be attached to the plywood at an acute angle. It is best to do this on a circular, but if it is not available, an ax or planer will do.
Also stock up on a couple of dozen small nails and a few roofing screws or furniture bolts. Carnations will be needed during the process of upholstering the front of the shovel with tin, and using self-tapping screws or, better, furniture nails, we will connect the handle and the plywood part of the shovel.
Completely forgot about one more detail. You also need a small wooden block, for example, with a section of 40x20 mm, which you need to fill in the end part of the plywood part along the edge with a rib. He will play the back part with us so that the snow does not fall on you from the shovel.
When all the material is prepared, you can collect our snow shovel.
To do this, as mentioned earlier, we nail a bar along the trailing edge onto the plywood using nails or fasten it with ordinary self-tapping screws.
We wrap the front edge with tin and fix it with nails. It is important to remember that the tin should fit well to the plywood both from above and below.
Next, we attach the stalk of the shovel. If you use furniture bolts, then we first drill holes of the required diameter in the center both in the handle and in plywood, after which we install the bolts with their heads down. It will be enough 2 - 3 bolts.
In the process of attaching the handle, or rather before drilling holes, set the handle in the center of the plywood part so that it rests on the bar, and the cut fits snugly against the plywood. If everything is done correctly, then the load on the plywood will be distributed in the best possible way.
The shovel is ready and you can get to work.
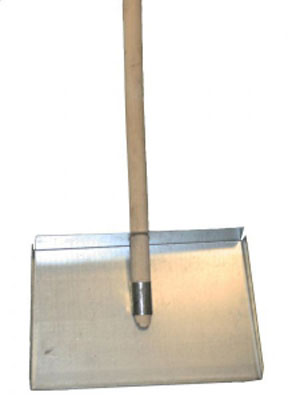 Metal snow shovel
The second option for a snow shovel that you can make yourself is a shovel with a metal main part. They are less common, since such a shovel requires a fairly large piece of sheet metal, more precisely aluminum. The thickness of the sheet must be at least 1.5 mm.
A steel sheet will not work here, as it is too heavy, and if you reduce the weight by reducing the thickness, the shovel will turn out to be too weak in terms of rigidity and it will be impossible to remove snow with it, except perhaps light dry freshly fallen and nothing more.
So, if you have the right piece of metal, you need to buy a shovel handle and hardware.
The piece of metal for the flat part of our shovel should be slightly larger than the final shovel, as part of the metal will go to the back wall and side bends. That is, to get a 50 by 50 cm shovel, the original piece must be 55 cm by 60 cm.
First, we draw our workpiece as follows: we retreat 5 cm along the edges and 5 cm on one side. We draw lines. It turns out a rectangle with a square inscribed in it.
Where the lines intersect, we cut the metal along the line to the intersection (5 cm) on both sides. This is easy to do with a grinder and a metal disc.
Next, on the bar with a hammer, bend three sides. The order of the bend depends on which line you made the cuts.
As a result, we get a kind of tray with walls on three sides. We bend squares 5 by 5 cm to the vertical walls and fasten them with small bolts and nuts and get a full-fledged shovel without a handle.
It remains to attach the handle to the metal part using the same technology as described above (plywood shovel) and you can use it.
It must be remembered that before operating this shovel, you must make sure that all edges are smoothed and you will not cut yourself on them. If this is not the case, then with the help of sandpaper or a file we “lick off” the edges. You can also cut the side walls a little from the back to the front, so that they become in the form of a triangle. Such a shovel will be more convenient to work with.