 In our article, we want to talk about the methods, methods and specifics of drilling various materials using drilling machines, from drills to machine tools. Also in the article we will try to tell as much as possible about the technique of drilling materials with various types of drills, ranging from conventional classic ones to crowns and Faustner drills.
Drilling holes in metal
You can make a hole in the metal, depending on its strength, quickly, or you can suffer for more than an hour and not succeed.
Drilling of metals is carried out with standard types of drills made of durable carbon steel. In order for you not to make a mistake in choosing a drill, we showed
him in the photo.
In everyday life, drills are usually used that do not exceed in diameter more than 13 mm. This is due to the fact that modern electric drills, screwdrivers and rotary hammers, or rather their cartridges, are produced precisely for this maximum drill diameter. Thicker drill bits are already available for stationary machines.
First, the drill must be correctly installed in the tool chuck. It must be firmly fixed so that during the drilling process the drill does not turn in the chuck, and there is no skew of the drill axis relative to the axis of the future hole.
Before starting drilling in metal, it is necessary to make a small dent in place of the drilling point - to punch. This word is used in connection with the fact that this is done with the help of a special tool - a core, which is attached to the drilling point and a dent is made with a hammer. If this is not done, then on a steel sheet, for example, in the process of starting drilling, the drill will begin to move away from the intended point. At the same time, the thicker the diameter of the drill, the more likely it is to miss. The part in which the hole is planned to be made must be firmly fixed so that if the drill jams, it cannot rotate around the drilling point.
Further, at low speeds (usually this is the minimum speed on an electric drill), we begin to drill metal. In this case, the drill must be located strictly perpendicular to the metal surface, and a sufficiently large force must be applied to the drilling tool. This force is greater, the higher the density of the metal. For soft aluminum, this is a small force, for steel it is several times greater.
If the thickness of the metal is large enough, then it is recommended to use a drill lubricant. This can be done with ordinary machine oil, which is added during drilling to cool and lubricate the drill. If there is no oil, then ordinary water will do. A fast drilling speed can lead to overheating of the drill and the loss of its strength characteristics, or its blunting - the cutting edge of the drill bends (the desired angle of the cutting edge is violated) and it stops drilling and simply scrolls.
In the process of drilling, it is very important not to warp the drill, otherwise it may break. The moment of completion of drilling is also very important (when the drill exits on another metal surface). It is at this moment that the greatest number of drill breaks occur. A thin layer of the remaining metal breaks sharply and the drill, especially with a diameter of more than 6 mm, can jam, which leads to a fracture of the drill. In this regard, it is necessary to reduce the drilling speed as much as possible at the final stage, especially if the drill is relatively low-power and the drill is thick.
If you are drilling metal using a machine, then it is even easier here. The force on the lever is much easier to apply, while there is no need to control the distortion of the drill.
If you plan to drill a sufficiently thick metal (more than 3 mm), and you need holes with a diameter of 13 mm, let's say, we recommend doing this in several stages. To begin with, we drill through the metal with a 3 mm drill, then expand it with a 6 mm drill, and then with a 13 mm diameter. The more adapter drills, the easier it will be to drill a hole, although the working time will increase.
Drilling holes in wood
Drilling wood is perhaps the simplest of all the things listed in the article. This can be done with a drill for metal, or using a specially designed drill for wood. It differs from a metal drill with a characteristic sharp tip. This tip serves as a guide so that the drill does not move out of the drilling point at the beginning of work.
Also, wood can be drilled with so-called spade drills to obtain holes of large diameter.
Due to the low density of wood, holes in it can be made at high speeds, and most importantly at different angles.
Drilling holes in chipboard
Chipboard is drilled in almost the same way as wood, though there are also a few nuances that we want to talk about. To begin with, we note that chipboard is drilled mainly by people involved in the production of cabinet furniture, where it is necessary not only to make a hole, but to do it in the right place and very carefully.
Unlike wood, the top coating of chipboard has a very high density, and if you don’t pierce, a wood drill bit, even with a sharp tip, can move to the side. It is best to do this with the same drill, just use a thin wood drill with a diameter of 2.5 mm for this. With it, we drill the upper dense layer, and then you can use any drill.
Most importantly, before the drill exits from the reverse side of the chipboard, it is necessary to significantly reduce the pressure on the tool so that a piece of chipboard does not break out at the exit point of the drill.
By the way, it is necessary to drill from that side of the chipboard, which will be the front.
Separately, we note the drilling of holes in chipboard for hinges. They are performed using the so-called Forstner drill. They come in diameters from 16 to 35 mm and more. You can see the appearance of the drill in the photo.
If you want to drill holes for the hinges at home with a drill, then you will need two drills of the same diameter. On one of them, you need to grind off the guide tip with a file, leaving only 1 - 2 mm from the plane of the cutting edge.
First - with a whole drill, having previously punched the drilling site, we drill chipboard to a depth of approximately 5 mm. After that, we change the drill to "modernized". With it, we drill a hole to the desired depth. When drilling, we slightly shake the electric drill around the drilling axis so that it does not jam, and the loop sits well in its seat. The easiest way to control the drilling depth is to periodically apply a loop to the installation site.
If you perform all operations with a whole drill, then due to the large depth of the hinge, for chipboard with a standard thickness of 16 mm, you simply pierce it with the tip of the drill through at the bottom of the drilling.
If you need a large diameter through hole, you need to use wood crowns. They are concave products with teeth along the edge. Crowns are fixed on the pilot drill with a special nut.
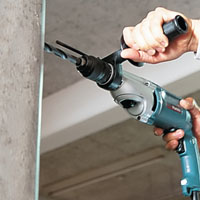
Drilling holes in concrete
In this part of the article, we want to talk about how to drill materials such as concrete, brick, as well as the walls of their stone materials.
To drill these materials, we need a special drill or a drill with a winning tip. Look at the photo.
Drilling in concrete or stone is usually required on walls i.e. vertical planes. Therefore, during drilling, it is necessary to constantly control the perpendicularity of the drill with respect to the surface. Drilling of stone materials is carried out in the mode of drilling with impact. We drill gradually, every 2 - 3 cm we feed the drill a little towards ourselves so that the drilling products (concrete or brick dust) come out through the drill. To control the depth of drilling, it is best to use the depth gauge, which usually comes with all modern electric drills and rotary hammers. Separately, it is worth noting the problems of drilling through holes through ready-made reinforced concrete elements, such as floor slabs PNO , for conducting various communications between floors, such as sewers or water pipes. The holes are usually quite large in this case and drilling with a crown without impact mode is required. The second point is the armature. If you stumble on a rebar with an ordinary crown, then drilling will no longer go further. The only exception here is for special crowns and drilling devices that cut both concrete and steel with equal ease.
Drilling holes in glass and ceramics
Drill and ceramic tiles are some of the most dense materials that have to be drilled. Usually this is done in order to hang a shelf in the bathroom, install lamps, or fix fittings on the door of a furniture cabinet. In addition to the significant hardness and density of the material, it also has great brittleness.
In view of the foregoing, it is necessary to drill such materials with a special drill. In the store you can find ceramic drills with a diameter of 4, 6, 8, 10 mm - they are the most common and usually suitable for most household tasks.
Drilling must be carried out at a fairly low speed. We start drilling carefully so that the drill does not go to the side. Then, with a little pressure (drilling mode is normal, so as not to split the material), we continue drilling. During the passage of the thickness of the material by the drill, it will heat up, and quickly enough. Therefore, we recommend that you put a glass of cold water next to it, into which you need to periodically dip the drill (you do not need to remove it from the drill). You can also pour a small amount of water directly on the drilling site, which will cool both the drill and the material.
Before the drill exits from the reverse side of the material, we slightly reduce the pressure on the drill so as not to split the tile or glass due to the load difference in the material.